
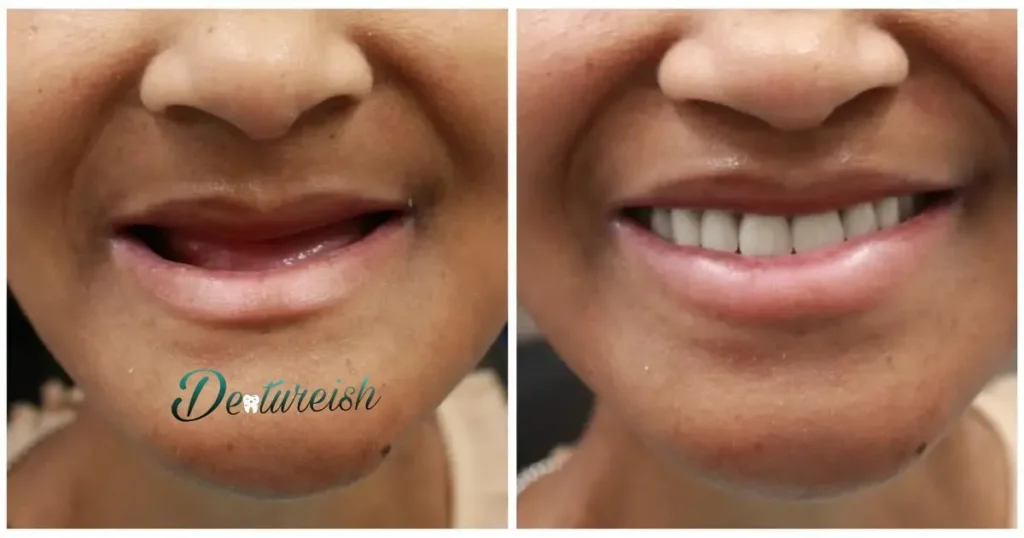
Applying secure denture adhesive is an important part of ensuring dentures fit properly and comfortably. Denture adhesive helps fill in gaps between dentures and gums to improve suction and retention. Using the right amount and technique when applying denture adhesive can prevent issues like loose dentures or adhesive oozing out during wear.
How To Apply Secure Denture Adhesive? is a common question for new denture wearers. Knowing the proper application method helps minimize messy adhesive issues. Applying too little offers inadequate hold while applying too much causes oozing and potential gum irritation. Following key steps ensures secure comfortable wear.
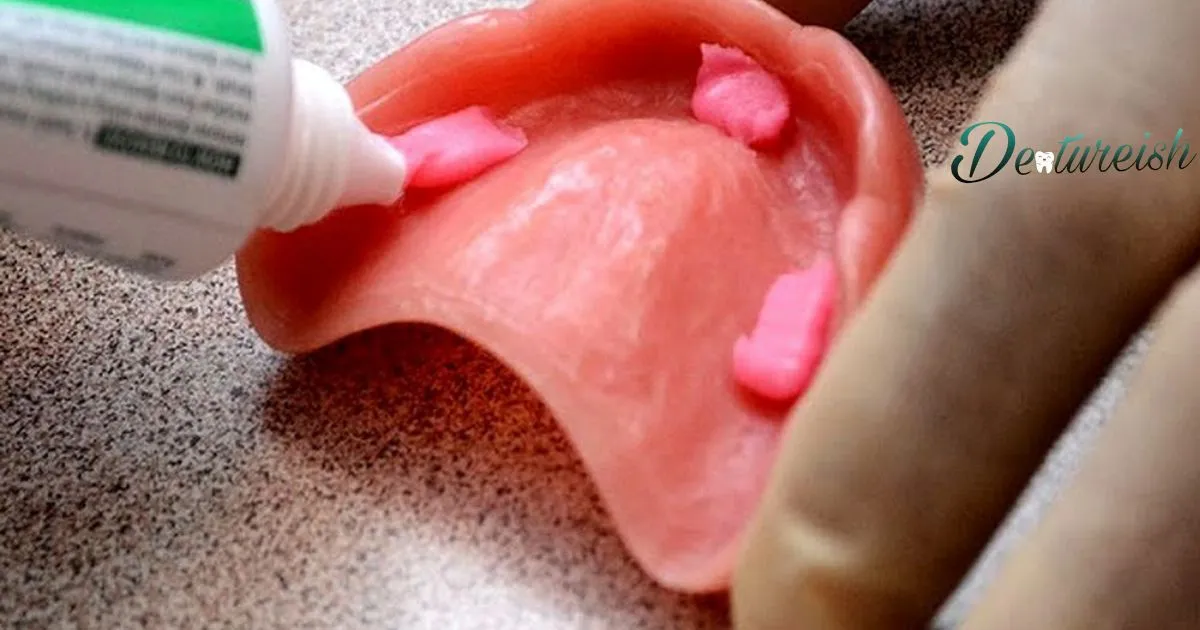
When applying denture adhesive, start with clean dry dentures and gums. Use a soft-bristled toothbrush to gently brush gums before application. Apply thin, even strips or dots of adhesive along the denture surface. Never spread the adhesive over the entire surface. Press dentures firmly into place, allowing time to set per adhesive directions.
What is secure denture adhesive?
Secure denture adhesive is a non-toxic, soluble material that is applied to the denture surface that touches the gums. It acts as a cushioning barrier while also enhancing suction between the denture and gums. Secure adhesive fills in gaps between the dentures and oral tissues, helping stabilize loose fitting dentures.
Formulations of secure denture adhesive include pads, pastes, powders and creams. These adhesives swell and expand when they come into contact with moisture, sealing the denture firmly against the gums. Common ingredients include cellulose gum, petrolatum, and zinc to provide hold.
What makes denture adhesive secure?
Denture adhesive is considered secure when it provides adequate holding power to keep dentures firmly in place. Secure adhesive offers denture stabilization and retention by increasing suction and reducing slippage.
Secure denture adhesives contain ingredients like cellulose gum and zinc that expand to fill spaces between dentures and gums. This swelling effect puts pressure on the dentures so they are pressed tightly against the gums, resisting shifting or loosening.
Secure adhesive also resists dissolving from exposure to saliva or liquids during eating and talking. This allows the adhesive bond to persist, keeping dentures secure all day long.
How does secure denture adhesive work?
Secure denture adhesive works by expanding the soft tissue contact area between the dentures and gums. When applied, the adhesive fills in uneven spots and gaps between the dentures and oral tissues. As the adhesive interacts with moisture, the ingredients swell to create a tighter, suction-like seal.
The cushioning barrier of secure denture adhesive conforms to the shape of the gums and dentures. The swollen adhesive helps prevent denture movement by resisting dislodging forces during chewing and talking.
It also protects the gums from rubbing and friction irritation. The adhesive seal lasts for many hours until slowly dissolving. This allows wearers to talk, eat and smile with confidence knowing their dentures are securely adhered.
Why use secure denture adhesive?
There are several benefits to using secure denture adhesive. The adhesive enhances retention and stability, allowing denture wearers to eat and speak without concern of slippage or loosening. It also provides a protective barrier for sensitive gums that may become irritated from denture rubbing and chafing.
In situations where wearers need to remove lower dentures that are stuck, the secure adhesive provides a reliable solution. The adhesive’s formulation facilitates easy removal of dentures, ensuring a hassle-free experience for individuals facing such challenges.
What are the benefits of secure denture adhesives?
Some key benefits of secure denture adhesives include enhanced denture retention and stability for up to 12 hours, increased chewing ability and bite force, improved fit for loose or ill-fitting dentures, gum protection and irritation relief, reduced impact and clicking noises, minimized food entrapment and buildup.
Secure adhesive also continues working even when exposed to liquids or saliva. This allows denture wearers to enjoy their favorite foods and beverages without slippery or loose dentures.
Formulations with aloe vera may also help soothe and prevent gum inflammation. With all these advantages, secure denture adhesive promotes an active lifestyle free from worry about loose or shifting dentures.
How to prepare dentures for secure adhesive application
Properly preparing dentures is a key first step for secure adhesive application. Start by thoroughly cleaning dentures to remove any food debris or plaque that could impact adhesive bonding.
Use a soft-bristled denture brush and non-abrasive denture cleaner, gently scrubbing all surfaces of the dentures including any hard-to-reach crevices. Rinse dentures under warm running water when finished brushing to wash away all loose particles.After cleaning, it’s critical to completely dry dentures before applying any adhesive.
Remaining moisture prevents the adhesive from properly bonding to the denture surface. Carefully blot dentures dry with a soft lint-free cloth or towel. Allow additional air drying time to ensure no residual dampness before adhesive application. Properly drying sets the stage for best adhesive performance.
How to clean dentures before applying secure adhesive?
Thoroughly cleaning dentures before applying secure adhesive removes plaque, bacteria, and food debris that could otherwise impact adhesive bonding and retention. Use a specialized denture brush and non-abrasive liquid soap or denture cleaning tablets.
Avoid regular toothpastes, which can be too abrasive. Gently scrub both the inside and outside surfaces of the dentures. Pay extra attention to crevices along the gumline where particles collect.
After scrubbing both upper and lower dentures, carefully rinse away all loosened particles under warm running water. Visually inspect under good lighting to ensure no debris remains before drying. Proper cleaning leaves dentures fresh and ready for secure adhesive application.
Why clean dentures before secure adhesive application?
Cleaning dentures before applying secure adhesive is critical for ensuring the strongest, longest-lasting bond possible. Any remaining food particles, plaque, or bacteria acts as a barrier that adversely affects adhesive bonding between the denture surface and gums. This leads to loose, uncomfortable dentures requiring premature re-application.
Thorough cleaning also removes substances that could irritate sensitive gum tissues under the denture surface. Small lodged particles rubbing against the gums during wear often causes painful inflammation and sores.
Proper cleaning prevents this, allowing secure pain-free wear. Overall, careful cleaning sets the stage for dentures to bond successfully with adhesive for maximum secure comfort.
How to dry dentures thoroughly before secure adhesive use?
After carefully cleaning dentures, it is equally important to dry them thoroughly before secure adhesive use. Start by gently blotting the dentures with a soft lint-free cloth, paying close attention to any microscopic crevices where moisture collects.
Allow several minutes of additional air drying time as well to give residual dampness a chance to evaporate.To assist drying, point a fan, hair dryer on a cool setting, or room dehumidifier toward the dentures for 5-10 minutes.
Keep dentures elevated on a clean towel rather than allowing them to rest on a counter where recondensation could occur. Thorough drying prevents adhesive bonding issues from residual moisture for securely fitted comfortable dentures all day long.
What happens if dentures are not dried properly before secure adhesive?
Applying secure denture adhesive to damp dentures almost guarantees denture slippage, discomfort, and other issues. Moisture prevents the adhesive from properly bonding to the acrylic denture surface and gum tissues. Rather than drying in place, the adhesive remains sticky, trapping saliva and food particles during wear.
Insufficient drying also causes the adhesive to break down faster, requiring multiple re-applications throughout the day. Excess moisture dilutes adhesive concentration critical for bonding strength.
With the seal compromised, dentures shift and rub, causing painful gum inflammation and sores in extreme cases. Overall, improper drying leads to loose ill-fitting dentures and discomfort rather than all-day secure wear.
Techniques for applying secure denture adhesive
The key techniques for properly applying secure denture adhesive include ensuring your mouth and dentures are completely clean and dry before application. Apply a small amount of adhesive initially, either in dots or a thin coat where the denture will contact the gums. Do not apply too close to the edges.
Bite firmly when placing the dentures to ensure a tight seal. Warming the tube before squeezing can allow the adhesive to flow more easily.It’s also important to find the optimal amount of adhesive for your needs through trial and error.
Start with a small amount and add more at the next application if the hold isn’t long enough. Conversely, use a bit less if the hold is too tight. Properly capping the tube after each use can prevent clogging. Using these techniques allows the adhesive to securely bond the denture in place.
What are some methods for applying secure denture adhesive?
Some key methods for application include gently squeezing the tube to dispense the adhesive after warming it in your hands. This allows it to flow smoothly. Apply small dots or a thin, even coat directly onto the denture surface that will contact the gums.
Adhesive strips are another option – peel off the backing and press into place inside the denture. Do not use regular household glues as these may not provide enough hold and could irritate the gums. Always use adhesives specifically designed for dentures.
How much secure denture adhesive should be used?
The optimal amount of secure denture adhesive to use will vary by individual. It’s best to start with a small amount and adjust from there. If the denture hold isn’t long enough, gradually add a bit more adhesive at the next application.
If the hold is too tight, use slightly less adhesive next time. Finding the right amount for your needs through trial and error allows for a secure hold without discomfort or slipping throughout the day.
Where should secure denture adhesive be applied on dentures?
Secure denture adhesive should be applied to the surface of the denture that will make contact with the gums. Apply an even, thin coat or dots of adhesive on the interior denture area that aligns with your gum line.
Be sure to cover the entire contact surface so there are no gaps between the adhesive and gums. Do not apply too close to the outer edges of the denture, as the adhesive may get pushed out when placing them in the mouth.
What mistakes to avoid when applying secure denture adhesive?
Some key mistakes to avoid are failing to properly clean and dry your dentures and mouth before application. This can prevent the adhesive from bonding properly. Applying too much adhesive can make removal difficult and uncomfortable.
Putting adhesive too close to the outer edges of the denture can cause it to be pushed out when placing them. Using regular household glues that are not specifically intended for dentures can lead to inadequate hold and gum irritation. Forgetting to cap the adhesive tube tightly after each use can cause the nozzle to clog.
Allowing time for secure denture adhesive to set
Secure denture adhesives typically take 5-10 minutes to set properly before inserting dentures. Allowing enough set time enables the adhesive to adhere firmly to the dentures and oral tissue surfaces. Inserting dentures too soon can result in suboptimal bonding and increased risk of loosening or displacement.
It is important to let secure denture adhesives set to maximize hold strength and comfort. The adhesive ingredients crosslink and cure during the setting period. This allows the material to solidify into a tacky, gum-like consistency with ideal viscoelastic properties to grip dentures.
Setting also enables the adhesive to intimately adapt to the surface irregularities on the tissue and denture for enhanced retention. Rushing the process by premature insertion leads to disappointing results.
How long does secure denture adhesive take to set properly?
Most secure denture adhesives take 5-10 minutes to set properly before denture insertion. This allows time for the adhesive ingredients to react and transform from an initial liquid or paste state into a tacky, solidified gel matrix.
Setting times can vary slightly between products and individual cases. Reading package instructions provides product-specific guidance. Allowing a full 10 minutes enables the adhesive to fully set in most situations.
If the adhesive feels solid yet still pliable at 5 minutes, this may suffice. However, waiting the full duration as indicated ensures ideal viscoelastic properties have developed for maximum denture retention. Having patience during setting allows the adhesive to work as designed.
Why allow secure denture adhesive time to set before inserting dentures?
Allowing secure denture adhesive adequate set time enables chemical crosslinking between adhesive ingredients to occur. This transforms the initial paste/liquid into a cohesive, pliable gel matrix with ideal tacky properties to grip dentures.
Premature insertion short-circuits the curing process, preventing optimal viscoelastic characteristics from developing. This impairs adhesive capability. Adequate setting also allows the adhesive to intimately adapt to microscopic ridges and grooves on tissue and denture surfaces. This mechanical interlocking enhances retention.
Rushing insertion decreases total surface area contact. Waiting for complete setting provides the necessary conditions for secure denture adhesive to work most effectively.
What happens if dentures with secure adhesive are inserted before fully set?
If dentures with secure adhesive are inserted before the adhesive fully sets, several problems can occur. The material will not achieve its maximum strength and grip. It also will not have formed the ideal viscoelastic gel properties needed to retain dentures.
The unset adhesive spreads thinly when dentures seat onto tissue, reducing overall thickness and effectiveness. It can also be pushed out from under the denture, eliminating retention zones.
An unset adhesive fails to effectively mechanically interlock with surface irregularities as well. Overall, premature insertion impairs secure denture adhesive from working optimally. Taking the extra few minutes to allow complete setting prevents these issues for best performance.
Tips for allowing proper secure denture adhesive set time
- Carefully read package instructions for the recommended setting time range
- Allow 5-10 minutes for the adhesive to fully set before inserting dentures
- Ensure dentures and tissue are completely clean and dry beforehand
- Apply adhesive in small strips/dots rather than a thin uniform layer
- Apply adhesive only to denture areas making direct contact with tissue
- After application, wait patiently and resist urge to insert dentures too quickly
- Check adhesive at 5 minutes – if solidified yet still pliable, setting may be complete
- Wait the full 10 minutes if unsure to guarantee proper adhesive cure
Maintaining dentures with secure adhesive
Using a secure denture adhesive is an effective way to help keep dentures in place throughout the day. When applying the adhesive, it’s important to start with a small amount to avoid using too much. Apply the adhesive dots or a thin layer on the denture surface that will contact the gums.
Allowing the adhesive to set on the dentures first before inserting them helps create a tighter seal. Biting firmly when first inserting the dentures also improves the holdMonitoring the amount of adhesive needed daily is part of good denture care.
Factors like diet, activities, and saliva flow impact how well the adhesive performs over time. Keeping track of when more adhesive is needed allows you to maintain the most secure fit. Using the minimal effective amount also reduces excess adhesive that requires cleaning from the dentures and gums later.
How to clean dentures with residual secure adhesive
It’s essential to thoroughly clean dentures daily to remove food debris, plaque, and residual adhesive. Handwashing dentures with a soft brush and warm, soapy water is recommended. Adhesive left on the dentures can lead to irritation.
Special denture cleaning solutions can also help break down adhesive residue.After handwashing, a short soak in denture cleaner or diluted bleach further helps lift adhesive from tiny crevices in the dentures.
Using an old toothbrush with firm bristles designated just for denture scrubbing can help remove stubborn bits of old adhesive as needed. Take care not to scrub too hard on the denture surfaces. Proper rinsing is key after cleaning to prevent residue buildup over time.
Tips for removing excess secure denture adhesive
Here are some tips for removing excess secure denture adhesive in easy, short sentences formatted as a table:
| Tip |
| Run dentures under warm water |
| Use finger to wipe away extra glue |
| Be gentle around gums |
| Insert soft brush between gums and dentures |
| Don’t scrub gums too hard |
| Rinse mouth with warm salt water |
| Dissolves leftover glue |
| Only reapply needed adhesive |
How often to reapply secure denture adhesive throughout day
How frequently reapplication of secure denture adhesive is needed varies by individual. For some, a single application provides a good hold all day. Others require refreshing the adhesive after meals or periodically when they sense loosening. As a general guideline, plan to reassess denture fit every 4-6 hours.
Notice if chewing becomes less stable or speaking clarity decreases, signaling it’s time for more adhesive. For special occasions like parties or business meetings, consider preventively reapplying even if the hold still seems adequate, to ensure continued secure comfort..
What to do if secure denture adhesive isn’t holding well later in day
Sometimes denture adhesive seems to lose effectiveness as the day goes on. First, oral conditions like low saliva or mouth dryness can prematurely break the seal. Sipping water and using saliva substitutes can help. Insufficient initial adhesive amount or incomplete cleaning before reapplying are also common culprits.
When same-day reapplication isn’t providing the usual secure hold, try thoroughly cleaning the dentures with soap and water first. This removes temporary barriers impairing fresh adhesive contact. If cleaning doesn’t restore the expected fit, consider switching to a fresh adhesive tube in case the current one is old.
Frequently Asked Question
Should dentures be wet or dry before applying adhesive?
Apply adhesive to clean, dry dentures for best hold.
Where exactly should the adhesive be applied on dentures?
Dot adhesive on denture surfaces that touch gums for secure fit.
What adhesive amount gives longest hold time?
Start with small amount and add more if needed for hold.
How to prevent nozzle clogging after using adhesive tube?
Cap adhesive tube tightly after each use.
Is regular household glue suitable for dentures?
Use only denture adhesives made specifically for securing dentures.
Conclusion
Using secure denture adhesive properly keeps dentures in place. First clean dentures completely. Apply small dots or thin layers of adhesive on surfaces touching gums. Press dentures firmly when inserting to seal adhesive. Add more adhesive during the day if dentures loosen.
Applying the right amount of secure denture adhesive takes practice. Start with a small amount and add more if needed. Follow package directions. Clean excess adhesive to avoid irritation. Visit a dentist if the adhesive stops working well. Proper use of adhesive improves denture comfort.